The Countertop Fabrication Process

Stone Fabrication

The polished beautiful granite countertop that you install in your kitchen or bathroom undergoes an extensive process of stone fabrication to achieve the finished product. It is remarkable just how much occurs during this process and how important it is to getting the most from your countertop for years to come.

This fabrication process is done by a professional stone fabricator, which is a very specialized person. In some cases the granite supplier also specializes in stone fabrication and everything can be done at their shop prior to being delivered to your home. The convenience of one-stop shopping can lead to having more control over the entire process.

In this article, we will explore the steps between slab selection and countertop installation, otherwise known as the fabrication process.

Inspecting the Slab

In this first step, the fabricator will inspect your chosen slab(s). Stone, being a natural product often contains characteristics indigenous to that particular material, similar to how individuals may be born with birthmarks. Some of these characteristics include dry seams, black spots, polyester resin fill, pits, and natural directional veining, feldspar or mica conglomerates (knots). Oftentimes, these marks make the stone what it is, unique and beautiful. On occasion, a customer may find certain characteristics unacceptable and the stone fabricator will work to avoid those during templating and fabrication process. As the customer will be enjoying this stone in their home for years to come, it is critical to jointly review the slab(s), laying out the template together to achieve the best possible outcome.

Prior to templating, a final inspection is made of the stone, identifying any areas unacceptable to the customer, or areas that are more severe than the normal characteristics described above. The fabricator will mark those areas and work to avoid those during templating, while balancing the effort to minimize waste and therefore cost.

Template Layout

Once the slab is inspected, it is then laid out and the previously created templates are arranged on the stone to ensure the best appearance of vein texture and color. The templates are also arranged to ensure appropriate flow for the various countertops in your layout. As an example with an L shaped countertop, or a countertop and an island that is parallel or perpendicular, you want to ensure the overall flow of the countertop pattern will work in your finished project. This natural beauty occurs more often in natural stone than in quartz, making this process especially important with granite or marble. This is where an experienced templater is key, it is a mix of experience and artistry. A beautiful countertop is just that, a piece of art, and you want it to be the focal point you are anticipating. For more information on the importance of templates in your project, see our article on templating and seams.

Cutting The Stone

The stone is then cut using either a water jet or a bridge saw. Historically, the bridge saw has been the favored tool, however in recent years the saw jet (combination water jet and saw) has come into play. This more specialized tool can be programmed with the parts you need to cut and determines where to use the water jet and where to use the saw, achieving higher productivity and quality.

The bridge saw cuts with a diamond segmented blade at a feed rate of approximately 7 feet per minute. The water jet cuts with high pressure water with garnet particulate suspended in the water at a feed rate of 1 foot per minute. In addition to increased productivity, the  water jet can cut circles, radius’, or any intricate pattern, where the bridge saw cuts only straight lines.

After the pieces are cut from the large slab, they are forwarded to a CNC machine and with the help of a vacuum lifting system. On the CNC machine, the stone countertop pieces are then fabricated.

cnc-cutting-granite-3

Fabricating

In this phase of the stone fabrication, the cutouts for your undermount sink, cooktop, or holes for faucets are all made. The first step is cutting the stone to approximately 1/16 of an inch of its final size. Then, the CNC (Computer Numerically Controlled) machine is programmed to know the size of the stone or stones on the table. You can put multiple pieces of stone on the table and work on them together. The CNC machine is then programmed to know where the stones are located and what to do to each of those pieces. Since every stone has different working characteristics, it is key to have an experienced and knowledgeable CNC machine operator. It is truly a job where artistry and technology meet to produce the optimal finished product. Some stone materials require the CNC machine to move more slowly, some require stone to be entered in a certain way. This equipment is a differentiator between garage operators and professionals. To achieve the most accurate result, we need a specialized operator and a specialized machine programmed with exact dimensions. For example, tracing a sink cut sheet on our stone versus using exact dimensions programmed into a highly specialized machine will achieve two very different results. As consumers, I believe we all want to achieve the best end result.

Once the holes are cut in the granite the edge is shaped by the CNC machine before the countertop is taken to final polish. There are a variety of stone edges to choose from, but the versatile CNC machine can produce any edge you select. For more information on the variety of edges, please see our article.

Strengthening the Stone

This step is specialized and may not be done by all stone fabricators. When you cut out the templates, you end up with a few stones that have thin rails of granite, for instance behind or in front of a sink or cooktop. By nature, those thinner pieces are not as strong as a larger surface area of stone. In the early 2000’s Great Lakes Granite and Marble conducted a study to find the best method for increasing the flexual strength of stone, specifically to reinforce this thin area. They tested various methods, working with the Marble Institute of America, and found the threaded rod technique described below to be the most effective.

In this step, rod slots (grooves in the granite) are cut and threaded rods are inserted into these grooves and encapsulated in high strength epoxy. When this process was studied, it was determined that this step increases the flexual strength of the countertop in that area by 400%. We should never be standing on our countertop, but we know it happens. Ensuring this step occurs in the fabrication process helps minimize the risk of a cracked countertop.

It bears mentioning that natural stone is extremely strong, approximately five times more than concrete. Even though different stones have various working characteristics, once installed in your home, the stone will likely outlive any kitchen you install it in. Understanding these characteristics and working within them during fabrication is key to ensuring your finished project is made to stand the test of time and use.

Polishing

We are approaching the end of the process here, polishing the stone. When the granite arrives to the fabricator from the quarry, the face of slab is already polished. Typically the granite face is not polished or changed at the fabricator’s shop. What does need polished, however, is the edge. Recall during the fabricating step the CNC machine created the countertop edge you selected for your project.

Regardless of the edge, it will now go through a 7 step polishing process. The industry standard is to use diamond polishing pads of increasing grit from 50 to 3,000 to polish the edge. Think of sandpaper in increasing grit to visualize how this process works. The CNC machine first starts with a diamond polishing pad of 50, then 100, 200, 400, 800, 1500, ending at 3,000. The CNC shapes and polishes at the same time, leaving the edge shaped and polished. Similarly, if your granite is ever scratched or damaged, this process is used to repair it.

Polishing

Seam Phantom

During this step, the edges of the stone ground to remove the microchipping and achieve the best and tightest seam possible. This gives you a finished product where the seam should fit nicely together, not drawing attention to it. For a closer look at the seam phantom process check out this video.

Sealing

At this point, we are almost ready to install our finished product. Granite is naturally 90% impervious to moisture migration. By applying one coat of sealer, we take that rate up to 95-97%. Both the edges and face of the stone are sealed during this step. Since sealer doesn’t degrade in an interior setting (like your kitchen or bathroom) it is pretty much a set it and forget it step. You may want to re-apply sealer in about 10-15 years. For the re-application, you can pick up a great sealer at your local home improvement store and apply it yourself.

Quality Control & Hand Finishing

The final step in the process is inspection of the stones. The stone fabricator will ensure the edges are uniform around all sides of the stone(s). Then they will be reviewed from multiple angles to make sure the light is bouncing off the edges uniformly, and the color of the top of the stone and the edges match perfectly. At this point, we have a finished product ready to be installed in your home.

Stone is truly a piece of natural art, and following this extensive process ensures that your finished product is a beautiful focal point of your project. Mixing experience, technology, tools and artistry is key to a stunning end result.

FAQ For Your Stone Supplier or Fabricator

These frequently asked questions outline processes that are best practices in the industry. Of course, every extra step takes time and money, but we feel these practices will leave you with the most beautiful outcome possible. Please utilize this information to empower yourself and ask these questions of the fabricator you are considering. 

Will my sink(s) be mounted with mechanical anchors?

At Great Lakes, we utilize mechanical anchors to attach our sinks to the stone countertop as we believe this ensures the best result for years to come. Holes for undermount sinks are fully cut from the stone slab and the inside rim of the cutout is polished. The countertop is also fitted on the bottom surface of the countertop with special cutouts that accept a steel anchor, allowing us to mechanically attach your sink to the top. 

Do you use reinforcement bars mounted in front and back of all cutouts (i.e sink/cooktop)?

When you have a cutout for a sink or cooktop you end up with a few areas that have thin rails of stone – for example the front or back of a sink or cooktop. When you use a thin piece of stone in this manner, the stone is not as strong as the larger surface areas. At Great Lakes Granite and Marble, we use the threaded rod technique. This is where rod slots (grooves in the granite) are cut and threaded rods are inserted into these grooves and encapsulated in high strength epoxy. It has been found that this step increases the flexural strength of the countertop in that area by 400%. To learn more about this process, see our article on the fabrication process. 

Are edges polished by machine or hand tools?

Depending on the edge profile, stone material, and configuration of the countertop, the edge may be polished by machine, hand or a combination of the two. At Great Lakes we use a series of steps in the polishing process. 

The industry standard is to use diamond polishing pads of increasing grit between 50 and 3,000 to polish the edge. Think of sandpaper in increasing grit to visualize how this process works. We utilize our CNC and Automated Edging Machine, starting with a diamond polishing pad of 50, then 100, 200, 400, 800, 1500, ending at 3,000. The CNC and the Automated Edging Machine shapes and polishes at the same time, leaving the edge shaped and polished. We try to use the CNC or Automated Edging Machine whenever possible because the accuracy and quality of the finished edge is unmatchable by hand. 

Do you use seam phantoming during fabrication?

Seam phantoming is when the edges of the stone are ground to remove the microchipping and achieve the best and tightest seam possible. At Great Lakes we do seam phantoming on every job, our objective is to give you the best possible result. Check out our seam phantom video here: https://youtu.be/vmrTU3JlayQ 

Can I be involved in laying out the template on the slab(s) for my project (i.e. selecting how the slab(s) will be used for my project)?

Template
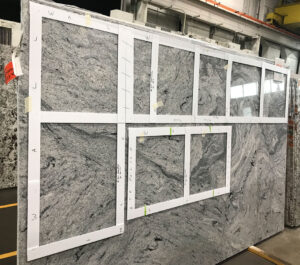
We highly encourage our customers’ involvement in the templating process. It is our philosophy that every countertop, regardless of the size of the project, should have a template to ensure a beautiful finished product. During this process, decisions will be made as to where your sink and faucet are located, your overhangs, corner radius’ and more. Our templater will visit your home and make a traditional template with coroplast strips. Some fabricators use digital templating tools, we elect not to go this route. After thirty years in the business, we’ve found the traditional template gives us a more accurate representation, allows the customer to see (in their home) what their countertop configuration is going to look like, and gives the customer the ability to see the template on the stone and determine how to lay out countertop configuration on their chosen slab(s). Once we have this template, we work together in the warehouse to actually lay the template against your stone slabs. This allows you to highlight the points you love in your stone, or “hide” parts you don’t care as much for. 

You can learn more about our templating process in our featured article.


How long has the fabricator been in the industry?

At Great Lakes, we’ve been in business since 1989, 31 years. We feel this is an important statistic because the experience both as a company and in individuals working for us, we’ve honed our skill set, the tools we use, how we approach our clients, and focusing on creating the best possible value for our client.

What is not included in my quote?

At Great Lakes, there are not any hidden fees, we believe in you having a single point of contact, working hard to understand your goals for the project and discuss everything from finish type to edges or speciality items up front. We price by the job and not the square foot, giving our best price up front, ensuring you have a full picture of your project costs without hidden surprises.