
How Much do Different Countertop Surfaces Cost?
Starting a kitchen remodel? New construction? Need to select a countertop surface but don’t know what’s in your budget?
Use our professional countertop estimation guide!
Complete a preliminary measurement of your solid surface and stone countertops and obtain an estimate of your project.
The Complete Guide to
Countertop Estimation
Table of Contents
- Chapter 1: Obtain the Proper Information
- Chapter 2: Determine Seam Preferences
- Chapter 3: Calculate Total Countertop Square Footage
- Chapter 4: Calculate Backsplash Square Footage
- Chapter 5: Get the Total Job Square Footage for Price Estimation
- Chapter 6: Estimate for upgrades and accessories to complete your estimate
Chapter One:
Obtain the Proper Information
To get an accurate estimate, gather as much information as possible. A detailed diagram (plan view) of your proposed space is helpful. When ordering countertops, a fabricator/supplier will measure (template) the space, but a detailed diagram will make your estimate more accurate. Include the following details:
- Length and width of existing countertops or cabinets
- Wall and door locations
- Sink location
- Refrigerator and dishwasher location
- Cooktop and/or range location
- Size of desired overhangs
- Angled Cuts/Corners
- Seam Location Preference
- Splash length and height if desired
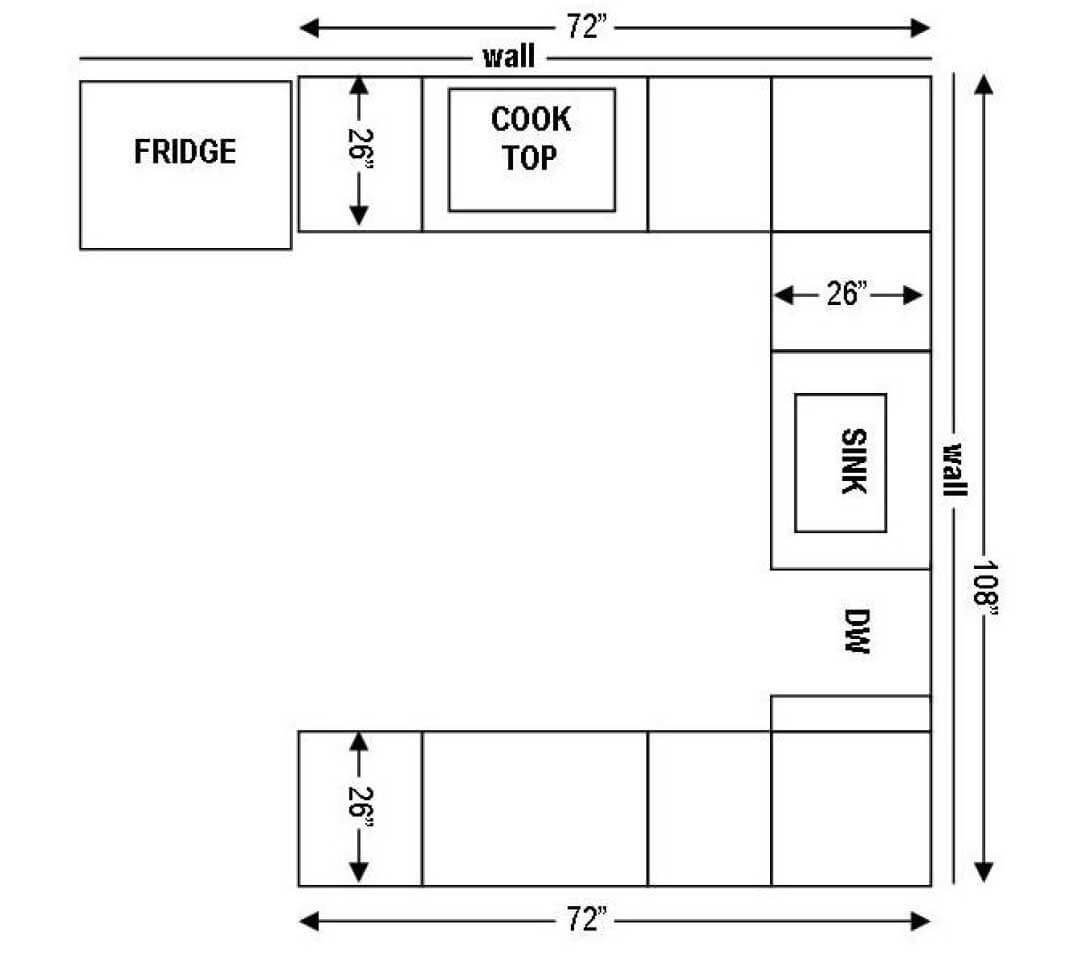
This diagram shows all cabinet base placements in the kitchen along with where the cooktop and sink will be placed. The fridge and dishwasher are also included in the diagram.
Chapter Two: Determine Seam Preferences
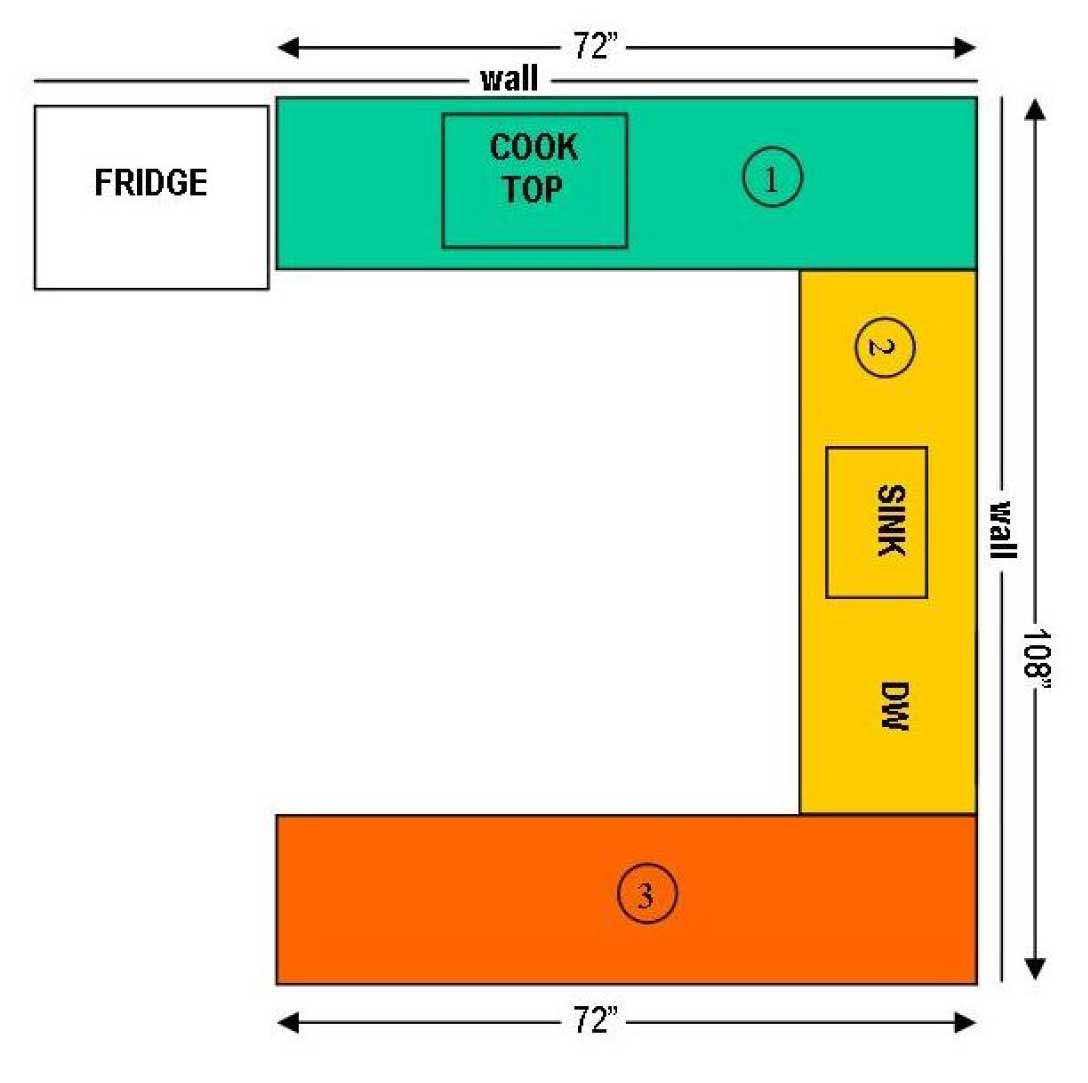
Seam number and locations will ultimately be determined by the templater, but it’s good to have preferences ready. A typical granite slab is 9′ x 5′, which limits the length of a countertop without a seam. Avoid seams through sink or cooktop cutouts to prevent weak points. Seams are often located in corners to minimize waste and cost. They also act as pressure relief joints for expansion and contraction. For example, in a kitchen with a 72” peninsula, place the seam on the 108” back wall for better aesthetics.
Here we have the marked seam placement with hashes. This seam placement divides our job into three, rectangular pieces.
Chapter Three: Calculate Total Countertop Square Footage
To calculate total square footage, use this formula:
(Length×Width)/144=Square Feet (s.f.)
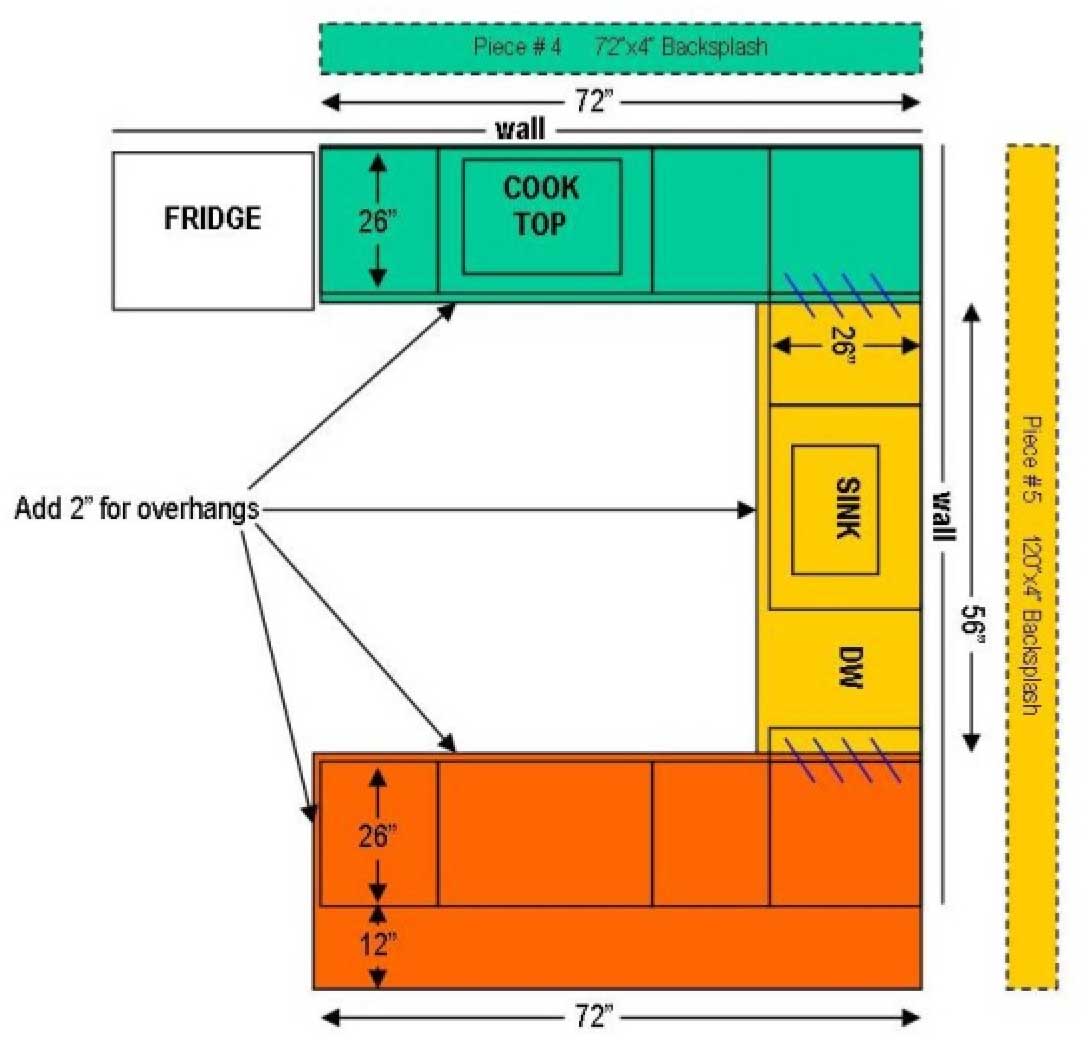
Include overhangs on exposed edges. Example calculations:
- Piece #1: 72”×26”/144=13 s.f..
- Piece #2: (108”−26”−26”)×26”/144=10.11 s.f.
- Piece #3: 74”×38”/144=19.52 s.f
Total countertop square footage: 13+10.11+19.52=43.63 s.f.
Chapter Four: Calculate Backsplash Square Footage (if needed)

Backsplashes protect walls from spills and provide a finished look. If you choose a backsplash made from the same countertop material, determine the desired height for square footage calculation. Example calculations for a standard 4” backsplash:
- Piece #4: 72”×4”/144=2 s.f.
- Piece #5: 120”×4”/144=3.33 s.f.
Total backsplash square footage: 2+3.33=5.33 s.f.
Chapter Five: Get the Total Job Square Footage for Price Estimation
To calculate the total job square footage you need to add the total countertop and backsplash square footage.
43.63 s.f. (counter tops) + 5.33 s.f. (backsplashes) = 48.96 s.f.
Round up to 49 s.f. For our example, we use $45 per square foot:
49 s.f. x $45 = $2,205
Total Job Estimate: $2,205
This estimate covers basic measure, fabrication, and installation. Customizations like edgework and additional cutouts will incur extra charges.
Chapter Six: Estimate for upgrades and accessories
Base prices often include a flat polish edge. Upgraded edges or waterfall details will likely have an upcharge. Consult your supplier and fabricator for costs associated with these enhancements.
Account for miscellaneous costs such as:
- Sink cutouts
- Cooktop cutouts
- Radius corners
- Drill holes for faucets, disposal buttons, soap dispensers
Refer to your supplier/fabricator’s price list for these items.
In Summary
- Gather detailed information about the job.
- Determine seam locations.
- Calculate countertop and backsplash square footage.
- Estimate material cost.
- Calculate edge work cost.
- Add miscellaneous costs.
- Sum all values for the final estimate.
Sorry, the comment form is closed at this time.