Budget Conscious and Beautiful Countertops

When we think of tackling a home project, dollar signs usually start swimming before our eyes. You can still create the look you are going for, have a show stopping kitchen or bath, and not break the bank. Approaching a project with a budget means paying attention to all of the details, and ensuring you don’t have hidden costs or surprises that can turn your budget upside down.

One way to keep things in check would be to use a spreadsheet or tracking system where you can outline the components of the project and associated costs. This will also help when comparing different estimates or contractor quotes. You can easily see what one company may be including, one may be giving an “allowance” for, and one may detail out as “customer supplied”. This should help to eliminate surprises or budget overages once you get started.

Countertops are only one part of the equation of course, but depending on the material you are hoping to use, it can be a significant part of your project. We have 9 tips that will help you achieve the dream look you are going for, while keeping your budget top of mind.

Doing Your Research

When it comes to countertops, there are a variety of options when it comes to companies or suppliers:

  • Big Box stores that may have samples in store and a relationship with a designated supplier or fabricator.
  • Small storefront operations may have a selection in the showroom and a relationship with a designated supplier or fabricator.
  • Stone Suppliers and Fabricators where you can work with an experienced project manager, select your slab(s) onsite, stone is fabricated at their facility and installed in your home.

There can be pros and cons in any type of scenario you elect to go with. Start by asking for recommendations from friends or neighbors who have done similar projects. You can inquire with other contractors, builders, or designers for their recommendation. You can head to the internet for research paying attention to reviews and recommendations. Often, buying from a supplier that imports directly from the source and does their own fabrication onsite can save money and headaches. By doing this, you are not paying the middleman’s markup on the material. Additionally, by dealing with the fabricator that is going to complete your job first hand, you minimize the opportunity for misunderstandings or missed expectations. When buying from a big box store, there are often several middlemen between the importers and the fabricators, which drives the end cost to the consumer up.

It is important to hire a well established, experienced, and fully insured fabricator. When you are interviewing potential partners, work to uncover any hidden costs or add-ons that may come up-like “import fees” “sink cut outs” or other mysterious charges.

Many fabricators or stone shops quote prices by the square foot which usually includes labor, delivery, installation, and a simple finish to the edges. Additional items like decorative edges, sinks, faucets, cutouts, plumbing hook-ups, and disposing and removing of old counters may cost extra.Some fabricators include a sink as part of their package, yet in some cases you may be able to save money by purchasing these “included” items elsewhere. Providing the removal of your old countertops demolition and disposal yourself may provide savings as well, and is another question to ask your supplier.

We’ve outlined a variety of money saving tips in this article to help you tackle your project and maximize your budget.

Are you a Do-It-Yourselfer? Ask About a Furnish Only Option

Some fabricators offer a “Cash & Carry” type option where you can select your stone, have it cut and finished to your required specifications, pick it up, and install it yourself. This is an ideal solution for a smaller project such as a bathroom vanity, outdoor bar or small kitchen area, drop zone or desk area. Or if you have a very strong back and several friends who are not prone to sue you for back injury then you could do a larger project on your own. The process would look like this:Sample Template

  • You visit the supplier and select your stone.
  • You provide your measurements and specifications for your project, including any necessary cut-outs.
  • The supplier takes care of the fabrication of the stone to your provided specifications.
  • You pick up the final product and provide the installation.

In this scenario you are paying for the material as well as the labor for the fabrication. You are saving on the templating cost of having someone from the shop come out to your home to measure, as well as the installation labor cost and the removal of the old tops. This option would only be recommended for an experienced contractor or handyman, someone confident in installing the countertop level and securely.

Shop Remnants

When someone purchases a slab for their project, they rarely use the entire slab or lot. The warehouse typically holds onto these leftover remnants for future projects. There are remnant pieces and remnant slabs. A remnant piece is a portion of a slab leftover from another project. A remnant slab could be one or a few slabs from the same lot that are still intact. In any project, most fabricators would recommend against using slabs of the same color but from different lots. Natural stone comes from the earth and even the same color will vary from lot to lot. If you try to pair slabs of the same color from different lots, it’s possible you will see color and pattern variations and may not achieve the look you are striving for.

When using remnants for your job, you can anticipate a material savings of approximately 10-20%. Remember that material is just one factor that goes into savings. If you use a remnant slab, but have multiple cutouts or an intricate edge, you are going to eat into that savings pretty quickly.

Remnant Slabs

For large projects, you likely need an entire slab or even more than one. To achieve the best look, we want to use slabs from the same quarry lot so they have the same coloring and patterning. When tackling a kitchen project, you might ask the supplier to show you the stones they have multiple remnant slabs from the same lot and work to make your selection from there.

Remnant Pieces

These are smaller pieces of stone slabs leftover from other projects. This is an ideal solution for a smaller size area, such as a vanity top, powder room, bar area, or similar small project. When you are hoping to use remnants for your project, it’s best to ask your project manager or supplier to show you just what they have in remnants so you don’t fall in love with something else as you are walking through the showroom or warehouse.

Seams

The seam is the place where two individual stones are joined together on your countertop. Depending on the size and layout of your project, a seamless countertop may be possible, but it may not be the most cost effective solution. Having an open mind when it comes to seams is another area where you can potentially squeeze out some savings in your countertop project.

In an L shaped kitchen, or anywhere using rectangular sized pieces you can better utilize the stone while minimizing waste thus reducing cost. In the example you can see the options when it comes to laying out a U shaped countertop. In the first option you see the areas that are waste by working to achieve this look without seams. In the second option to see the same countertop laid out minimizing waste, and therefore lowering cost. If cost is a driving factor, you can lay out your template on the stone using rectangles minimizing cost and waste. An educated project manager and experienced fabricator will always attempt to minimize the appearance of seams, and use any waste in other areas of the project or job. In any project, we would recommend asking the fabricator where they will be seaming the countertop and how they work to minimize the appearance of the seams. In some instances, the fabricator can use the need for a seam to make a statement. Bookmatching is where two adjoining surfaces mirror each other like an opened book. In this project, the fabricator worked with the client to create a gorgeous 16’ island with a bookmatched seam down the center. Bookmatching is a specialized aspect of a project which isn’t necessarily budget conscious. Knowing your project options can help determine where you can save and where you can splurge to get the finished project of your dreams.

For more information on the seam process, see our templating and seams article.

countertop-templates

Other Ways to Save with Remnants

In some kitchens, clients elect to use a contrasting color on their island versus the perimeter cabinets. This could also give you the opportunity to mix and match stone and make use of remnant pieces.

If you are willing to get creative and explore different options, be sure to select a company and project manager that you trust to give you different ideas. When using remnants, whether it’s slabs or pieces, there is an opportunity for savings in materials. If you are looking to cut costs this way, keep an open mind when it comes to color, seams, and other creative opportunities to maximize your savings. This is a key area to partner with a Project Manager that has experience and creativity to help you achieve your desired look and stay within your budget.

Kitchen-contrasting-granites
Kilauea Quartz
Seam Locations
Delicatus White Granite Kitchen

2 cm Stock

Historically, 2 cm was the standard in natural stone countertops. 3 cm is the current standard for thickness in stone. This change likely means that stone suppliers or fabricators have 2 cm stock they are looking to move. The combination of the extra stock and the fact that 2 cm thickness means less overall material, you may have an opportunity for savings.

As with everything else, there are a few things to consider when looking at this option.

  • With a 3 cm slab, we can do an overhang for 12” without a support bracket on an island for example. With 2 cm, we can achieve 8” before needing a support bracket.
  • 2 Cm Laminated Edge
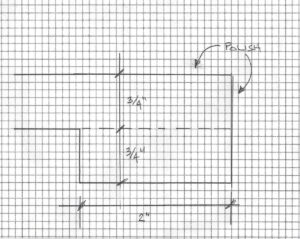
With a 2 cm slab, the edge of course is thinner, so fabricators typically laminate the edge to make it appear thicker. This is usually done by cutting a 2” piece and gluing it one edge on top of the other to create a thicker edge look that measures 1.5” thick.

These potential concerns should be discussed with your project manager and fabricator and of course weighed against the budget and your desired use of the space to make an educated decision that is right for your project.

Choose a Standard Edge

The more intricate the edge, typically the higher the cost. Fortunately, the more “basic” styles of edges which tend to be less expensive are also very stylish and beautiful. Standard edges can be straight or curved and will complement any kitchen style. Standard edges include Flat Polish, Bevel, Full Bullnose, Half Bullnose and Quarter Round. View all edge styles and details in this comprehensive Edge Article.

When it comes to edges, the savings is in the labor costs. All standard edges can be done on a line edge machine. The speciality edges all require the CNC machine. The additional machine time and speciality work is what can drive the labor costs up. When cost is a driving factor, you can still achieve a beautiful look with one of these standard edges.

Choose a Polished Finish

For natural stone, there are several finishes available, polished, honed, and leathered. The standard and most common polished finish will be a classy, sophisticated look that reveals the stone’s natural beauty.

A honed finish is smooth but not shiny. It will cut down on glare, and may hide imperfections a little better than a polished finish, giving a matte appearance to your stone.

A leathered finish is created by using diamond tipped brushes during fabrication. The surface of the stone looks and feels like a textured leather. Leathering brings character to the counter, but does leave a bit of an uneven surface which can be problematic for high traffic, everyday use.

A polished finish is the most common and popular, meaning you are not sacrificing much when choosing this option and keeping your budget in check.

Fantasy Brown Edge
Granite Countertop with Polished Finish

Reduce the Number of Necessary Cutouts

The number and type of holes the fabricator will need to cut into your stone will affect your final price. Minimally, you’ll have a cutout for your kitchen sink and faucet in the kitchen. You may have others for a soap dispenser, instant hot, range, or vents. For a bathroom, you will also have sink(s) and faucets. For a bar or drop zone, you may not have any cutouts. It’s important to discuss this with your fabricator and have the specifications for any of the items you need cut out. Take this into consideration when designing your countertop knowing that each cutout carries a cost due to the specialized machinery and time it takes to make them.

Choose an Overmount Sink

There are a variety of sink types to choose from in a bathroom or kitchen project. If we boil it down to two overall configurations, we are looking at undermount or overmount (drop-in) sinks. Undermount sinks mount to the bottom of the countertop and are held in place by heavy-duty clips and caulk or a special adhesive. This style of sink does have a rim, but it isn’t visible as it’s resting up against the bottom of the counter. In this case, the edge of the countertop is exposed and therefore needs to be finished appropriately. This fabrication adds cost to the countertop project, and the undermount sink is possibly more expensive as well.

Exotic Concrete Counter Top In An Outdoor Kitchen

An Overmount or Drop-In Sink is typically less expensive, both in terms of materials and labor. This type of sink has a visible lip around the perimeter that rests flat on the countertop. The sink drops straight into the countertop cut out and is secured by hidden metal clips under the countertop and silicone caulk under the sink’s edge. With this type of sink installation, there is no need to finish the edge of the sink cutout, saving cost in fabrication.

Your sink choice may come down to looks, function, or cost. This is another area you can explore with your project manager and fabricator to determine the best solution for your project. To explore more sink styles and get inspiration for your project, check out this guide to Choosing the Perfect Kitchen Sink.

We’ve covered nine ways you can achieve your dream look while still maintaining your budget. The key theme in this and most other home improvement projects is to know your budget as you get started, work with partner(s) and supplier(s) you trust, and keep diligent tabs on the components of your project. With those steps in place, hopefully you will embark on a pleasant process and be enjoying your renovated space in no time.